
Dehydrated Starter
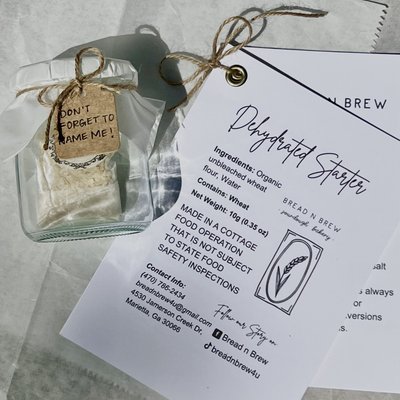
Dehydrated Starter
$10.00
View Details
Welcome to Your Bread n Brew Starter!
Congratulations on choosing Jane Dough / John Dough to begin your sourdough journey! This guide will walk you through the entire process, from rehydration to your first loaf of homemade bread.
Let’s Get Started!
Step 1: Rehydration of Your Starter
The first step is to wake up your starter, and it’s super easy!
Materials Needed:
• 1 tablespoon of dehydrated starter
• 2 tablespoons of warm, filtered water (not too hot)
• A clean glass jar or bowl
• A spoon for stirring
Instructions:
1. Mix the Starter and Water
• In a clean jar, combine the 1 tablespoon of dehydrated starter with 2 tablespoons of warm water. Stir until the starter dissolves into the water.
2. Let it Sit
• Leave the jar uncovered or cover it loosely with a coffee filter, cloth or even rest the lid on top. Let it sit in a warm spot (ideally 70°F/21°C) for 4-6 hours.
• Check it occasionally—don’t be alarmed if it looks a little clumpy or uneven at first; it will soften as it absorbs the water.
3. Add Flour
• After 4-6 hours, add 2 tablespoons of flour to the mixture and stir to combine.
• Let it rest again, uncovered or lightly covered, at room temperature for 12-24 hours.
4. Rename your new starter!
• Give it a name that suits its bubbly personality—this little starter is officially part of your kitchen family!
Tip: If you can’t find a warm spot, try placing the jar near a kitchen light or inside the oven with just the light on (not the heat).
⸻
Step 2: Feed Your Starter
Now that your starter is awake, it’s time to start feeding it regularly.
Feeding Schedule:
• Daily Feedings (Room Temperature):
• After the 12-24 hours, discard half of the starter (about 2 tablespoons, this is where you can start discard jar in your fridge), then add 2 tablespoons of flour and 2 tablespoons of water. Stir well and let it sit for 12-24 hours. Repeat the process daily until your starter is bubbly and doubles in size after about 4-6 hours of feeding.
• Weekly Feedings (Fridge Storage):
• If you want to slow things down, you can refrigerate your starter once it’s fully active. After each feed, store it in the fridge. Feed it once a week by discarding half and refreshing with 2 tablespoons of water and flour.
• Don’t forget to take it out and let it come to room temperature before baking!
⸻
Step 3: Knowing When Your Starter is Ready
Your starter should be bubbly and doubling in size within about 4-6 hours of being fed. It will smell slightly tangy, like yogurt or vinegar.
Check for these signs:
• Bubbles: Active bubbles should form throughout the jar.
• Doubling in Size: It should double in size after 4-6 hours of feeding.
• Smell: It should have a pleasantly tangy, mildly sour smell. If it smells like rotten or very strong vinegar, it’s not ready yet.
• Float Test (optional): Drop a spoonful of your starter into a glass of water. If it floats, it’s ready to bake!
⸻
Step 4: Troubleshooting
1. Starter isn’t bubbling or rising:
• Possible Causes: Your starter may be too cold, or it may need more time to develop.
• Solution:
• Make sure your starter is kept in a warm area (70-75°F/21-24°C).
• Increase the feeding frequency to twice a day for faster growth.
2. Hooch (liquid on top):
• What it is: Hooch is a liquid that forms when your starter is hungry and needs more flour.
• Solution: Simply stir the hooch back into the starter or pour it off. If it continues to form regularly, increase your feedings.
3. Starter smells like rotten or very strong vinegar:
• Possible Causes: Your starter may be too acidic or has been neglected.
• Solution:
• Try discarding half and feeding it with a fresh amount of flour and water.
• Make sure you’re discarding half each time to keep the acidity balanced.
⸻
Step 5: Storing Your Starter
Room Temperature Storage:
• If you bake frequently, keep your starter at room temperature and feed it daily.
• Always discard half before feeding to prevent it from growing too large.
Fridge Storage:
• If you don’t bake often, store your starter in the fridge after it’s fully active.
• Take it out once a week to feed it. Discard half, refresh with flour and water, and leave it out at room temperature for a few hours before returning it to the fridge.
Long-Term Storage:
• You can also dry your starter by spreading it thinly on parchment paper and letting it air-dry. Once dry, break it into pieces and store it in an airtight container for months. To rehydrate, follow the steps from Step 1.
⸻
Step 6: Your First Bake!
Now that your starter is healthy and active, it’s time to bake!
Start with a simple sourdough bread recipe, or try one of our favorites, which will be provided along with your starter package.
FAQs
• How long will my starter last?
Your starter can live for years if cared for properly, with occasional feedings and proper storage.
• Can I use any flour?
While all-purpose flour works well, whole wheat or rye flours help to jump-start the fermentation process due to their higher nutrient content.
• What if my starter has mold?
If mold appears, discard the starter, clean the jar thoroughly, and start again. It’s better to be safe than sorry!
Need More Help?
If you have any questions or need further support, feel free to contact us at Bread n Brew. We’re here to help your starter thrive!
Powered by
